Input Type Time - Complete Guide
Input type time is a relatively new HTML form input type that allows users to input a time value in a standard format. It's especially useful for creating forms that require users to input a time, such as appointment scheduling or event registration.
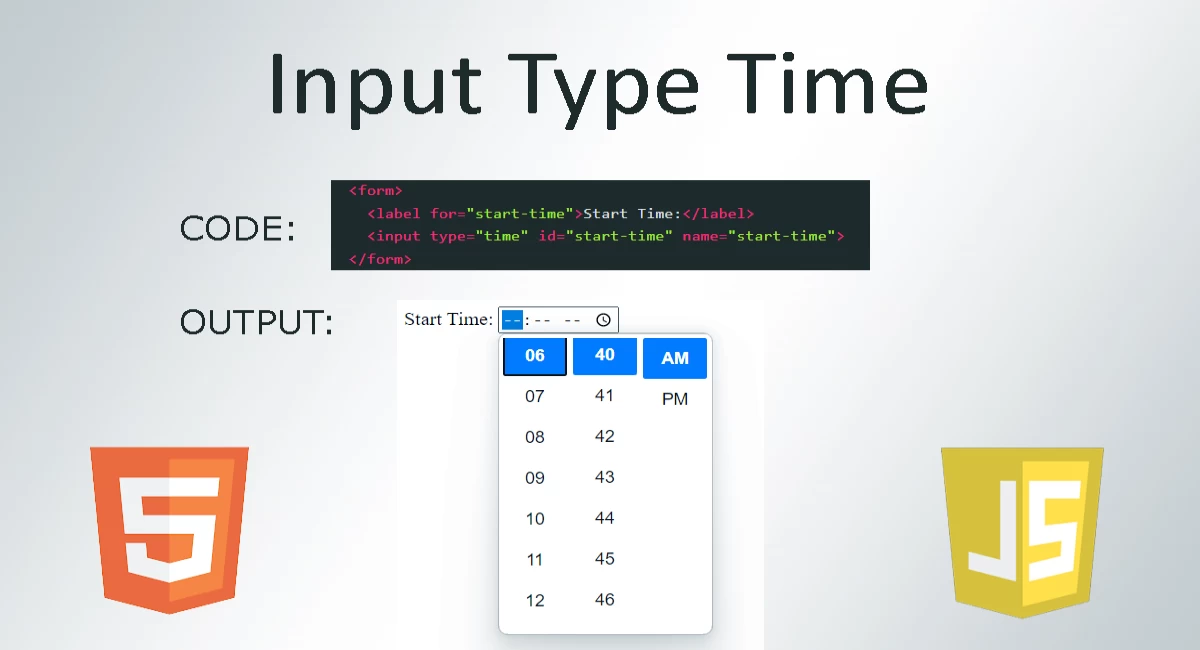
Input Type Time - HTML
To use input type time in HTML, you simply need to add the "type" attribute to a form input element and set it to "time". Here's an example:
  <form>
    <label for="start-time">Start Time:</label>
    <input type="time" id="start-time" name="start-time">
  </form>
This will create a time input field with a standard time picker interface, depending on the user's device and browser. Note that the "id" and "name" attributes are important for identifying the input element in JavaScript and submitting the form data to the server.
JavaScript for changing Time in Input Type Time
JavaScript can be used to manipulate input type time elements just like any other form input element. Here's an example of setting the default value of an input type time element:
  <form>
    <label for="start-time">Start Time:</label>
    <input type="time" id="start-time" name="start-time">
  </form>

  <script>
    document.getElementById("start-time").value = "09:00";
  </script>
This will set the default value of the input type time element to "09:00". You can also use JavaScript to validate the input value, set the minimum and maximum values, or perform other manipulations.
jQuery for changing Time in Input Type Time
If you prefer to use jQuery, you can use the same syntax to manipulate input type time elements. Here's an example:
  <form>
    <label for="start-time">Start Time:</label>
    <input type="time" id="start-time" name="start-time">
  </form>

  <script src="https://code.jquery.com/jquery-3.6.0.min.js"></script>
  <script>
    $("#start-time").val("09:00");
  </script>
This will set the default value of the input type time element to "09:00" using jQuery.
Input Type Time - CSS
Input type time can be styled using CSS, just like any other HTML element. Here's an example of styling the time input field:
  <form>
    <label for="start-time">Start Time:</label>
    <input type="time" id="start-time" name="start-time" style="background-color: #f7f7f7; border: 1px solid #ccc; padding: 5px;">
  </form>
This will add a light gray background, a gray border, and some padding to the time input field.
jQuery Timepicker Plugin
The jQuery Timepicker plugin is a widely-used tool for improving the functionality and appearance of time input fields in HTML forms. Below is an example of how to implement the jQuery Timepicker plugin:
  <!-- Include the jQuery library and Timepicker plugin -->
  <script src="https://code.jquery.com/jquery-3.6.0.min.js"></script>
  <script src="https://cdnjs.cloudflare.com/ajax/libs/jquery-timepicker/1.13.18/jquery.timepicker.min.js"></script>

 <input type="text" id="my-time-input">


<script>
$(document).ready(function(){
$('#my-time-input').timepicker();
});
</script>
This code will create a time input field with an ID of "my-time-input" and initialize the jQuery Timepicker plugin on it. The plugin allows users to choose a time from a dropdown menu and also supports keyboard input and mouse scrolling.
The jQuery Timepicker plugin provides many options and settings for customizing the appearance and functionality of the time input field. You can modify the time format, set time intervals, and disable specific times, among other things. For more information and examples, please refer to the official Timepicker website.
By utilizing the jQuery Timepicker plugin, you can enhance the user experience of your HTML forms and provide users with more choices and flexibility for time input.
Formatting Time in HTML Forms
When using the time input type in HTML forms, it's important to understand how to format the time in a way that's both user-friendly and compatible with various browsers and devices. Here are some tips for formatting time in HTML forms:
- Use the 24-hour clock format (e.g. 13:45) for international compatibility and consistency.
- Include leading zeroes for single-digit hours and minutes (e.g. 09:30 instead of 9:30).
- Use the "step" attribute to specify the time interval (e.g. step="900" for 15-minute intervals).
- Provide clear instructions and labels for the time input field, such as "Enter a time in the format HH:MM".
- Use JavaScript or jQuery validation to ensure that the user enters a valid time in the correct format.
Here's an example of how to format the time input field in HTML:
  <label for="meeting-time">Select a time for your meeting:</label>
  <input type="time" id="meeting-time" name="meeting-time"
         min="09:00" max="18:00" step="900">
In this example, the time input field is labeled "Select a time for your meeting" and includes the ID "meeting-time". The "min" and "max" attributes specify the earliest and latest times that can be selected, while the "step" attribute sets the time interval to 15 minutes.
By following these formatting guidelines and best practices, you can ensure that the time input field in your HTML forms is easy to use and understand for all users, regardless of their location or device.
JavaScript Validation for Time Input
While HTML5 provides built-in validation for time input fields, it's also a good idea to add JavaScript validation to ensure that the user enters a valid time in the correct format. Here's an example of how to validate a time input field using JavaScript:
  <script>
    function validateTime() {
      var timeInput = document.getElementById("my-time-input").value;
      var timeFormat = /^([01]?[0-9]|2[0-3]):[0-5][0-9]$/;
      if (!timeFormat.test(timeInput)) {
        alert("Please enter a valid time in the format HH:MM.");
        return false;
      }
      return true;
    }
  </script>

  <form onsubmit="return validateTime()">
    <label for="my-time-input">Enter a time:</label>
    <input type="text" id="my-time-input">
    <input type="submit" value="Submit">
  </form>
In this example, the JavaScript function "validateTime()" is called when the form is submitted. The function first retrieves the value of the time input field with ID "my-time-input". It then uses a regular expression to check if the input matches the format "HH:MM" (where HH is between 00 and 23 and MM is between 00 and 59). If the input is invalid, an alert message is displayed and the function returns false, preventing the form from being submitted. If the input is valid, the function returns true and the form is submitted.
By adding JavaScript validation to your time input fields, you can ensure that the user enters a valid time in the correct format, reducing errors and improving the user experience.
Examples of Date and Time Input Fields
There are several ways to format and display date and time input fields in HTML. Here are some examples:
Date Input Field
The simplest way to allow the user to enter a date is to use a date input field:
  <label for="my-date-input">Enter a date:</label>
  <input type="date" id="my-date-input">
This will display a calendar icon next to the input field, allowing the user to select a date from a popup calendar. The date will be formatted according to the user's locale, but you can also specify a specific format using the "pattern" attribute:
  <label for="my-date-input">Enter a date (YYYY-MM-DD):</label>
  <input type="date" id="my-date-input" pattern="\d{4}-\d{2}-\d{2}">
Time Input Field
To allow the user to enter a time, you can use a time input field:
  <label for="my-time-input">Enter a time:</label>
  <input type="time" id="my-time-input">
This will display a time picker control, allowing the user to select a time using the hours, minutes, and seconds dropdowns. You can also specify the format of the time using the "step" attribute:
  <label for="my-time-input">Enter a time (in 15-minute increments):</label>
  <input type="time" id="my-time-input" step="900">
Date and Time Input Field
To allow the user to enter both a date and a time, you can use a datetime-local input field:
  <label for="my-datetime-input">Enter a date and time:</label>
  <input type="datetime-local" id="my-datetime-input">
This will display both a calendar icon and a time picker control, allowing the user to select both a date and a time. Note that not all browsers support datetime-local input fields, so you may need to provide a fallback option for unsupported browsers.
Time Range Input Field
A time range input field allows the user to select a range of times, such as the start and end times of an event. Here's an example of how to create a time range input field:
  <label for="event-time-range">Select the time range for your event:</label>
  <input type="time" id="event-start-time" name="event-start-time">
  <span>to</span>
  <input type="time" id="event-end-time" name="event-end-time">
In this example, two time input fields are used to create the time range input field. The first input field has the ID "event-start-time" and the second input field has the ID "event-end-time". The label "Select the time range for your event" describes the purpose of the input field.
When the form is submitted, the start and end times can be accessed using the IDs of the input fields. For example, in JavaScript:
  <script> var startTime = document.getElementById("event-start-time").value;
  var endTime = document.getElementById("event-end-time").value;
</script>
By using a time range input field, you can allow the user to easily select a range of times without having to enter each time separately.
Additional Resources
Here are some additional resources for learning more about input type time and HTML forms:


Comments
No comments yet.
Add Comment